Documentation menu
Big trades, Smart roles and BT2 single orders
A large aggressive order rarely prints as one trade. It fills against many resting orders, often across several prices, and the tape shows a burst of small prints. AK FlowBook groups a burst of same-side prints into one block and draws it with its total size. A burst can come from one large order or from several orders that hit together. For single orders, use BT2.
This page covers three things:
- Raw big trade boxes (toolbar BT (burst), in the MORE list).
- Smart roles, which describe what price did after the burst (also BT (burst)).
- BT2 dots for single aggressive orders (toolbar BT2).
Raw big trade boxes
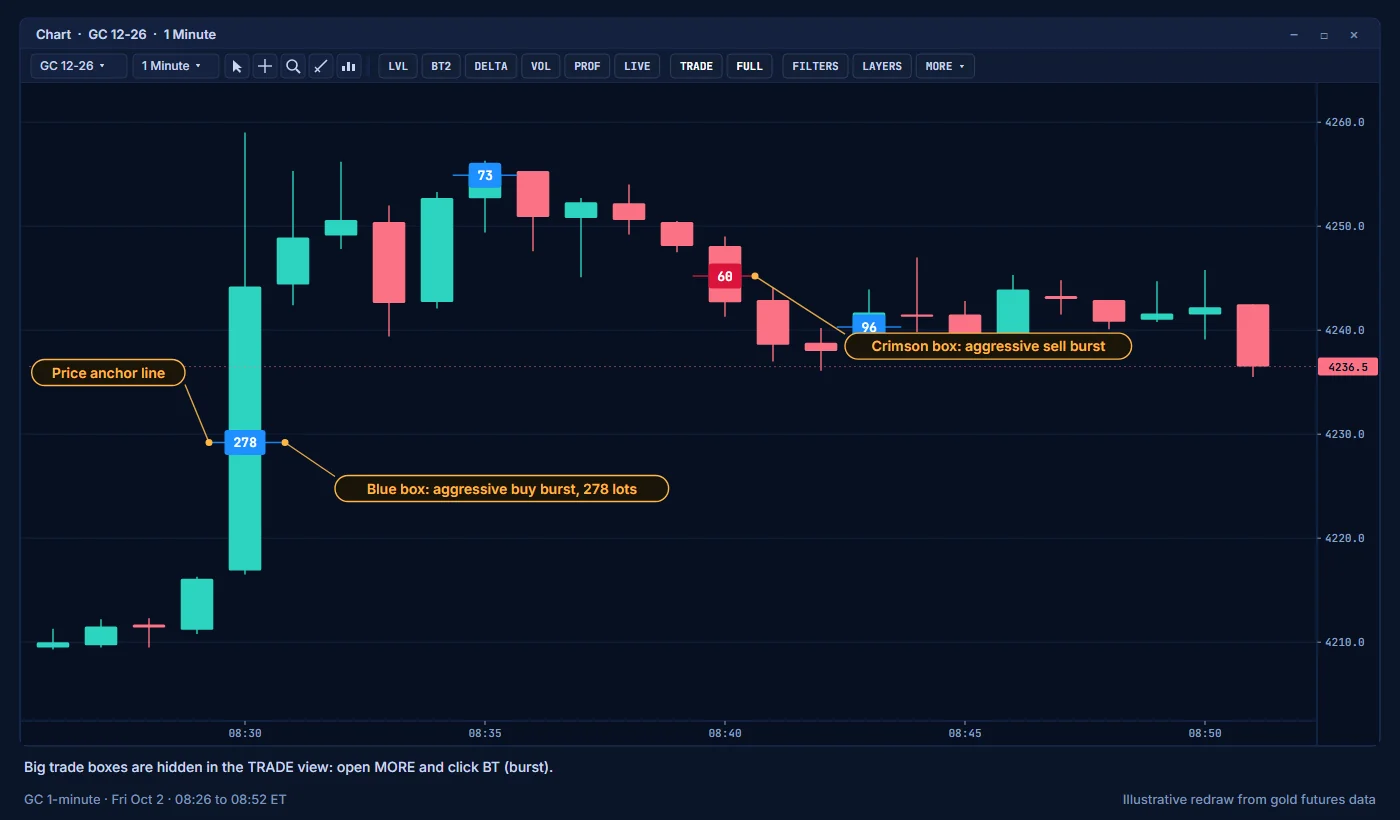
- Each big trade is a box at its execution price.
- The number in the box is the total size in lots.
- A blue box is an aggressive buyer. A crimson box is an aggressive seller.
- A short price anchor line connects the box to the price.
- A burst is shown when its total size reaches Minimum BigTrade Lots. The GC default is 50 lots.
- AK FlowBook draws up to 8 big trade boxes per candle.
Smart roles
Smart adds what happened next. After a big trade, AK FlowBook watches how price reacts and tags the likely role that order played. A Smart mark is a ● dot on the candle where the order traded, with the role name, in light blue for a buyer and orange-red for a seller.
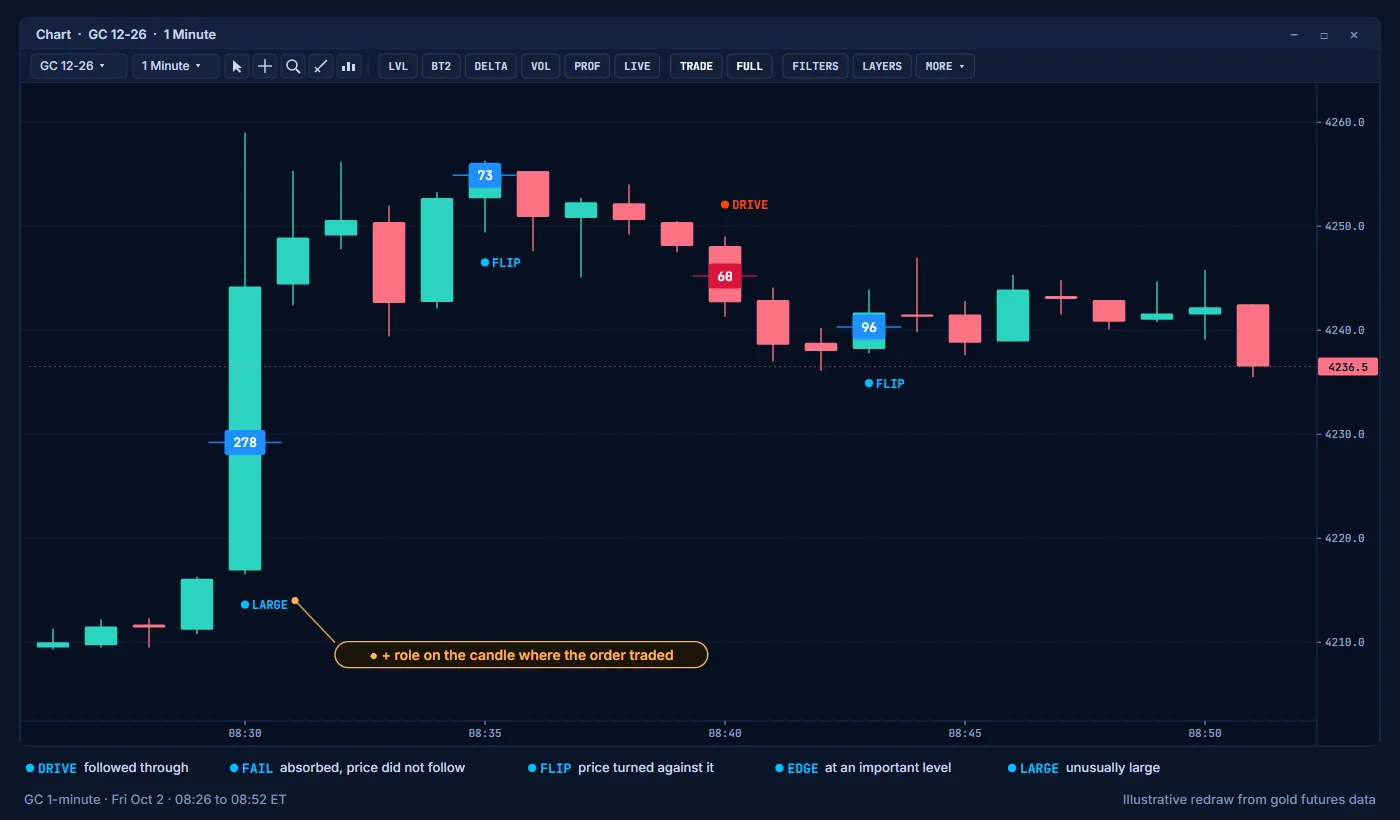
| Role | What it describes |
|---|---|
DRIVE | Price followed through in the direction of the order. |
FAIL | The order was absorbed. Price did not follow. |
FLIP | Price turned against the order. |
EDGE | The order traded at an important level. |
LARGE | The order was unusually large for this market. |
Roles describe what already happened. Because Smart needs to see the reaction, the role appears after the raw box, and it is placed back on the candle where the order traded.
How to read the roles
- A big order is a clue about intent, not a forecast. What price does after it is the information.
FAILat a level is a form of absorption: someone traded size and the other side took all of it. See Reading absorption.EDGEtells you the order happened where it matters. Look at which level it was, and what delta and the map show there.LARGEis relative. What counts as large depends on the instrument and the time of day.
BigTrade View
The BigTrade View setting (group 02 Big Trades) controls what you see: 0 Off, 1 Raw (boxes only), 2 Smart (role marks only) or 3 Raw + Smart. The default is 3 Raw + Smart: boxes and role marks together.
BT2: single aggressive orders
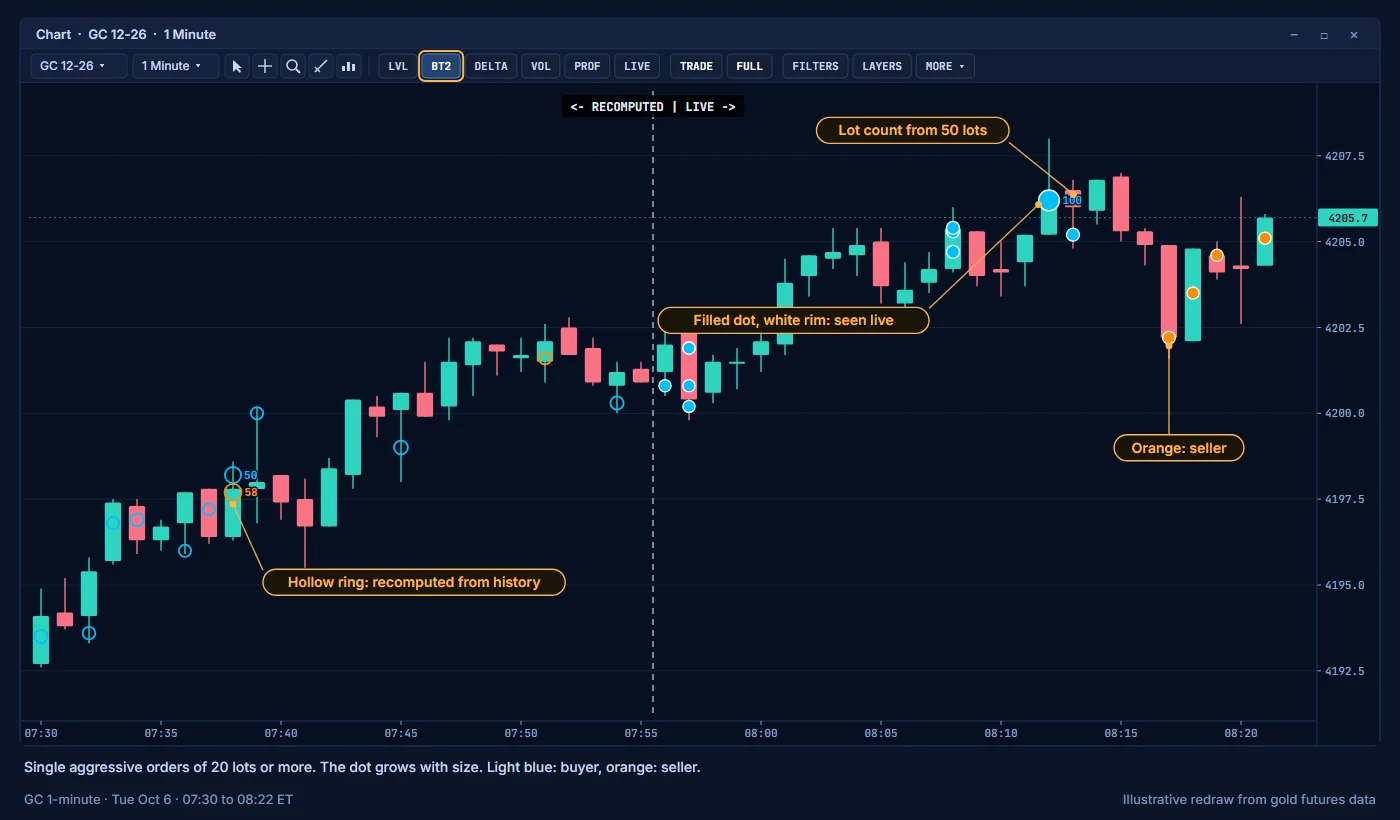
BT2 marks single aggressive orders as dots.
- Each dot sits at the price where the order first traded.
- The dot grows with the size of the order.
- Light blue dots are buyers. Orange dots are sellers.
- A filled dot with a white rim was seen live. A hollow ring was recomputed from history.
- Larger orders also get the lot count next to the dot.
BT2 uses a lower display minimum than big trade boxes and has no Smart roles. Use it to see the flow of mid-size aggressive orders. By default, orders of 20 lots or more get a dot and orders of 50 lots or more also get the lot count. You can change both in the LAYERS window.
History
With Load 1-Tick History for Parent BigTrades and Load & Analyze Historical BigTrades on (the defaults), AK FlowBook rebuilds big trades for historical bars from tick data. It keeps 30 days of big trade history by default (Historical BigTrade Days). Marks from history sit on the left of the <- RECOMPUTED | LIVE -> separator. Turn on LIVE on the toolbar to see only marks seen live.
Settings
| Setting | Group | Default |
|---|---|---|
| Big trade marks | 00 Chart View | Off (TRADE view) |
| BigTrade View | 02 Big Trades | 3 Raw + Smart |
| Minimum BigTrade Lots (BT = burst aggregate) | 02 Big Trades | 50 (GC recommended) |
| Burst Merge Window (ms) | 02 Big Trades | 350 |
| Maximum Raw Blocks Per Candle | 02 Big Trades | 8 |
| Show BigTrade Price Anchor Line | 02 Big Trades | On |
| Load & Analyze Historical BigTrades | 02 Big Trades | On |
| Historical BigTrade Days | 02 Big Trades | 30 |
| Show Child Prints (Advanced / Noisy) | 02 Big Trades | Off |
| Show Smart BigTrade Marker on Source Candle | 02 Big Trades | On |
| Load 1-Tick History for Parent BigTrades | 00A Instrument & Performance | On |
The merge window is how close in time same-side prints at the same or a nearby price must be to count as one block. See Settings for the full list.
Education only. Not financial advice. Trading futures and CFDs carries a high risk of loss.