Documentation menu
Liquidity sequences: LQ-B*, LQ-S* and the chain
The 15-minute liquidity layer (see Liquidity) marks levels, takes and sweeps. This page covers the two features built on top of it: the LQ-B*/LQ-S* labels and the origin chain. Both describe a sequence of events after liquidity is taken. They are setup context, not instructions: no entry, stop or target levels are drawn or sent.
Enable origin-TF liquidity layer on, on closed bars. They draw only inside the last Draw marks in the last N bars bars (2,000 by default).In this layer, B marks the long side (a low was taken and price came back above it) and S marks the short side (a high was taken and price came back below it). B labels are green, S labels are red.
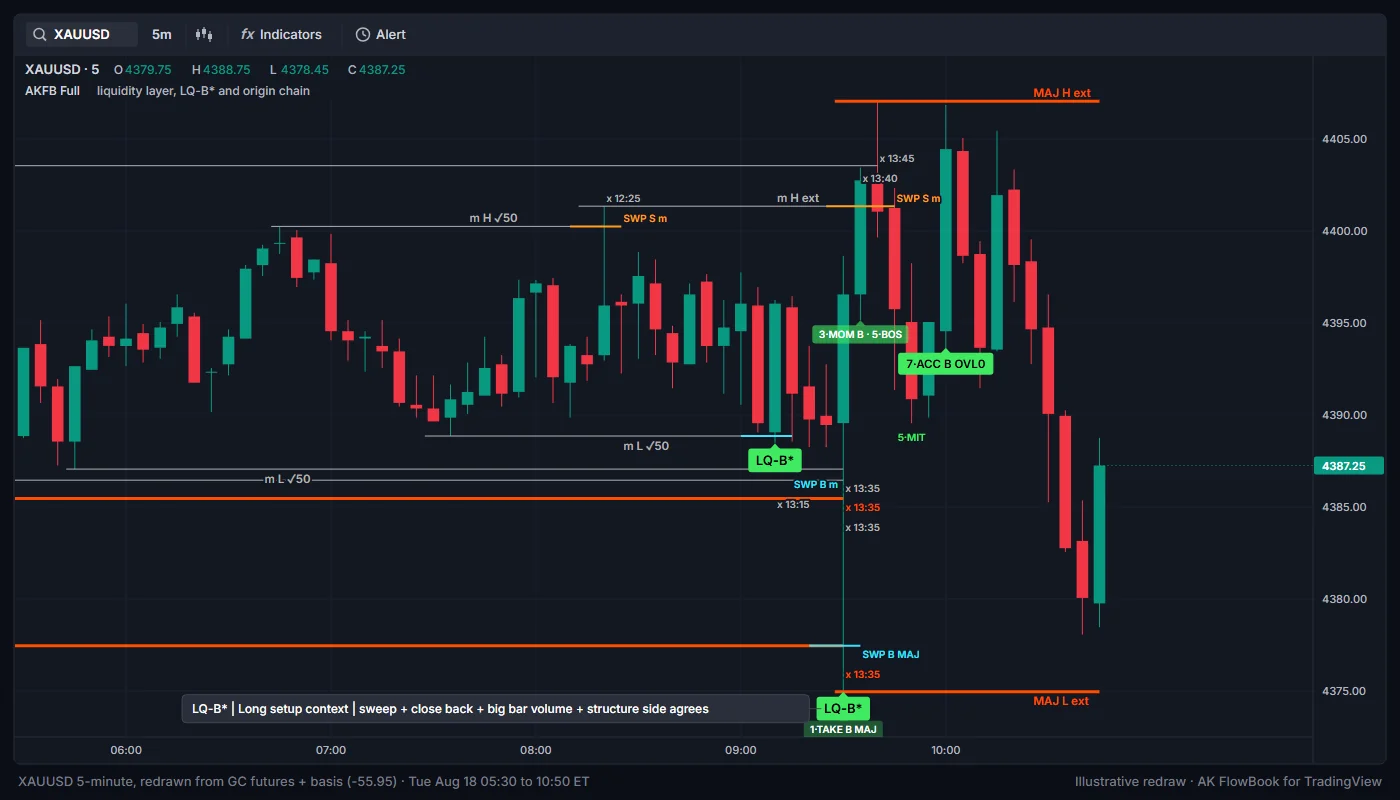
LQ-B* and LQ-S*
An LQ-B* or LQ-S* label appears on a sweep bar (an SWP sweep of a 15-minute level or a chart swing) when:
- the bar's volume is at least
Big volume: bar volume ≥ k × average(2.0) times the average volume of the previousBig volume: average length (bars)(60) bars, or, withNext bar may confirm (mark one bar later)on, the next bar has that volume; - the star
*means the structure side agrees: the recent sequence of chart swings already leans the same way as the sweep.
| Label | Placement | Meaning |
|---|---|---|
LQ-B* | Below the low, green | A low was swept with high volume and price closed back above it; structure leans long. |
LQ-S* | Above the high, red | A high was swept with high volume and price closed back below it; structure leans short. |
LQ-B, LQ-S (no star) | Faded | Same, but structure does not agree. Shown only with Also show LQ-S / LQ-B without * on. |
Hover the label to see its tooltip, for example LQ-B* | Long setup context | sweep + close back + big bar volume + structure side agrees.
No labels are added inside the news window (News blackout (UTC)).
The origin chain
The origin chain follows one liquidity take through a sequence of steps, using closed 5-minute and 15-minute candles. Only one chain runs at a time. Turn it on or off with Run the origin chain.
The settings group is called OL3 · Origin chain (8 steps). Only steps 1, 3, 5 and 7 draw labels. Step 2 is the ✓50 flag on the taken level, step 4 is not used, and steps 6 and 8 are timers.
| Step | Label | What happened |
|---|---|---|
| 1 · Take | 1·TAKE B <class> or 1·TAKE S <class> (plus ✓50 if the level had that flag) | A 15-minute level of at least 1 · minimum 15m level class was taken. A low taken starts a B chain; a high taken starts an S chain. Faint label. |
| 3 · Momentum | 3·MOM B · 5·IND or 3·MOM B · 5·BOS (S mirror) | Within 3 · momentum within N closed 5m candles (3), a closed 5-minute candle moved in the chain's direction with a strong body (3 · body / range ≥, 0.55) and a large range (range ≥ × ATR(5m), 0.8), closing beyond the taken level. If this does not happen in time, the chain fails and the TAKE label is removed. |
| 5 · Structure | 5·BOS, 5·IND or 5·MIT | 5·BOS: price closed beyond the last 5-minute pullback swing. 5·IND: not yet (induction). 5·MIT: price pulled back to 5 · mitigation level (share of impulse) (0.5) of the momentum move. |
| 6 · Induction horizon | none | If the chain is still in IND after 6 · induction horizon (minutes) (240), it fails. |
| 7 · Acceptance | 7·ACC B OVL<n> or 7·ACC S OVL<n> | After 5·MIT, a candle in the chain's direction with a body of at least 7 · accept candle body / range ≥ (0.5) that closes beyond the previous bar and beyond the mitigation level. Once per chain. Solid label. |
| 8 · Bias lock | none | After step 3, takes on the opposite side are ignored for 8 · bias lock (minutes) (240). |
The chain also fails if price trades beyond the extreme of the original sweep.
OVL count
OVL<n> on the 7·ACC label counts how many extra references overlap the chain, from 0 to 3:
- +1 if the taken level had the
✓50flag, - +1 if the prior day high or low sits in the chain's zone,
- +1 if another level on the opposite side was taken since the take and sits in that zone.
The tooltip reads, for example, 7·ACC | Long setup context | OVL = overlap count (0-3).
How to read the sequence
- The chain is a way to structure what you see after a sweep: was there a decisive move away (MOM), did structure shift (BOS) or not (IND), did price come back to the middle of the move (MIT), and did a candle then hold that area (ACC)?
- A step label describes what already happened on closed candles. It does not predict the next step. A chain can stop at any step, and a chain that fails at step 3 removes its TAKE label.
- Read it together with the map. A chain that starts at a weekly level is a different picture from one in the middle of the day's range.
Alerts
With the global alert switch on, the layer sends messages that start with AKFB Full | Liquidity layer:
alert(): LQ-S* / LQ-B*(on): a part such asLQ-B* XAUUSD 5 Long setup context.alert(): chain momentum / accept(on): parts such as3·MOM Short setup context XAUUSD @ <price>and7·ACC Long setup context XAUUSD @ <price>.
Several parts on one bar are joined into one message. The price is the bar's close, shown for context. See Alerts.
Settings
| Setting | Default | What it does |
|---|---|---|
Show LQ-S* / LQ-B* | On | Draws the labels. |
Also show LQ-S / LQ-B without * | Off | Adds faded labels when structure does not agree. |
Big volume: bar volume ≥ k × average | 2.0 | Volume multiple needed on the sweep (or next) bar. |
Big volume: average length (bars) | 60 | Bars in the volume average. |
Next bar may confirm (mark one bar later) | On | Lets the bar after the sweep supply the volume; the label then appears one bar later. |
alert(): LQ-S* / LQ-B* | On | Includes these labels in liquidity-layer alerts. |
Run the origin chain | On | Runs the chain and draws its labels. |
1 · minimum 15m level class | m | Lowest level class (m, L2, MAJ) that can start a chain. |
3 · momentum within N closed 5m candles | 3 | Time allowed for the momentum candle. |
3 · body / range ≥ | 0.55 | Body share the momentum candle needs. |
range ≥ × ATR(5m) | 0.8 | Range the momentum candle needs, in 5-minute ATR. |
5 · mitigation level (share of impulse) | 0.5 | How deep the pullback must reach for 5·MIT. |
6 · induction horizon (minutes) | 240 | Time limit for the IND state. |
7 · accept candle body / range ≥ | 0.5 | Body share the acceptance candle needs. |
8 · bias lock (minutes) | 240 | How long opposite-side takes are ignored after momentum. |
alert(): chain momentum / accept | On | Includes 3·MOM and 7·ACC in liquidity-layer alerts. |
Education only. Not financial advice. Trading futures and CFDs carries a high risk of loss.